• About
  • Blog
  • Recipe Index
  • Your Celebrations
  • Contact Me
Menu

Serendipity Bakes

Street Address
City, State, Zip
Phone Number

Your Custom Text Here

Serendipity Bakes

  • About
  • Blog
  • Recipe Index
  • Your Celebrations
  • Contact Me

Gingerbread Marshmallows

December 5, 2015 Nicola King

So here we are in December. Who'd have thought it would come around so quickly! It kind of snuck up on us this year. We're always one of the first to put up our Christmas tree and decorations although it seems like this year everyone's ahead of the game and had them up last weekend. But we always wait until December, so this weekend is going to be jam-packed with Christmas excitement, parties, movies and yummy festive treats :)

I have been holding on to Gingerbread Marshmallows for a good few months now. I love marshmallows, love making them and especially eating them. The home-made ones are always that extra bit squidgier inside, smoother and silkier. They are simply delicious.

I started off with a few different recipes and ended up being captivated by these yummy ones from Joy The Baker, slightly mesmerised by the chocolate and crushed gingerbread biscuits adorning them. I wasn't sure I was going to go that far (but I did) and wanted to try making little gingerbread men out of them (which I did); I then got completely carried away and decided to make little gingerbread s'mores out of them (definitely glad I did). So much fun and such a sticky mess!

So making them also gave me a fantastic workout as I ran out of glucose half-way through and then had to walk the entire local area looking for more, only to find out that all the local shops have stopped selling it. You can imagine my delight at this! But then I came home, determined to find some more in my cupboard (you know that feeling when you know something you've lost is just lurking that little bit farther into the cupboard) and lo and behold, I found one last tube. A bittersweet moment - but at least I smashed my step count for the day!

So marshmallows are super simple to make. The only downside to them is that when you make them yourself, you realise that they're not at all, even the tinsiest bit, healthy for you. But just close your eyes and will those thoughts out of your mind for the next 20 minutes!

It's important to prepare the baking tin. I use a 8 inch square tin and this makes quite thick marshmallows which are generally deeper than regular cutters - so if you want to cut them into shapes you might want to choose a bigger tin or split the marshmallows into two tins. Usually I line the tin and then lightly grease the lined paper before adding the marshmallow. Joy The Baker's recipe calls for coating the tin with oil and then a very generous layer of icing sugar, thickly applied so the sides and bottom look solid white. The marshmallow did come out fairly easily but I did have to pry the sides away which made them a little dented. 

To make the marshmallow, you first put a half cup of water in a stand mixer and sprinkle the powdered gelatin on the top, leaving it for 10 minutes. When it's ready it will be a sort of yellowy sticky consistency. Meanwhile mix the caster sugar, glucose and salt in a saucepan and heat it on a medium heat until it melts. Give it a little stir. Then once the sugar is melted, turn up the heat to medium-high and leave without stirring until your thermometer reaches 240 degrees. Do keep a close eye on it and don't wander away from the stove! When the temperature is reached, turn the stand mixer onto low speed and then slowly add the sugar syrup in a long drizzle. You want to pour it in a stream somewhere between the side of the bowl and the whisk, more towards the side of the bowl if in any doubt as you must be careful the sugar doesn't hit the whisk and splatter over you - it's very hot! As you're pouring this in, gradually turn up the speed until all the sugar has been added and the mixer is working at full speed. Keep whisking for 10 minutes until the mixture has turned into a lovely white, billowy marshmallow. It looks like gooey clouds.This is the time to add your spices and vanilla. You can add whatever you like; I might be inclined to put a little less cloves in next time as that was a very prominent flavour in mine. Mix for another few minutes and then pour the marshmallow into the tin to set. If you need to smooth the surface, use a wet spatula.

After the marshmallow has set (ideally overnight) you can then decide how you want to present it. When you cut it up, either use a sharp knife that has been dipped in hot water and if you're using a cookie cutter, again pop this into hot water. Try not to get too much water all over your marshmallow as it will turn into a squidgy mess (although the upside of this is that you're compelled to eat all the messy bits then and there!)

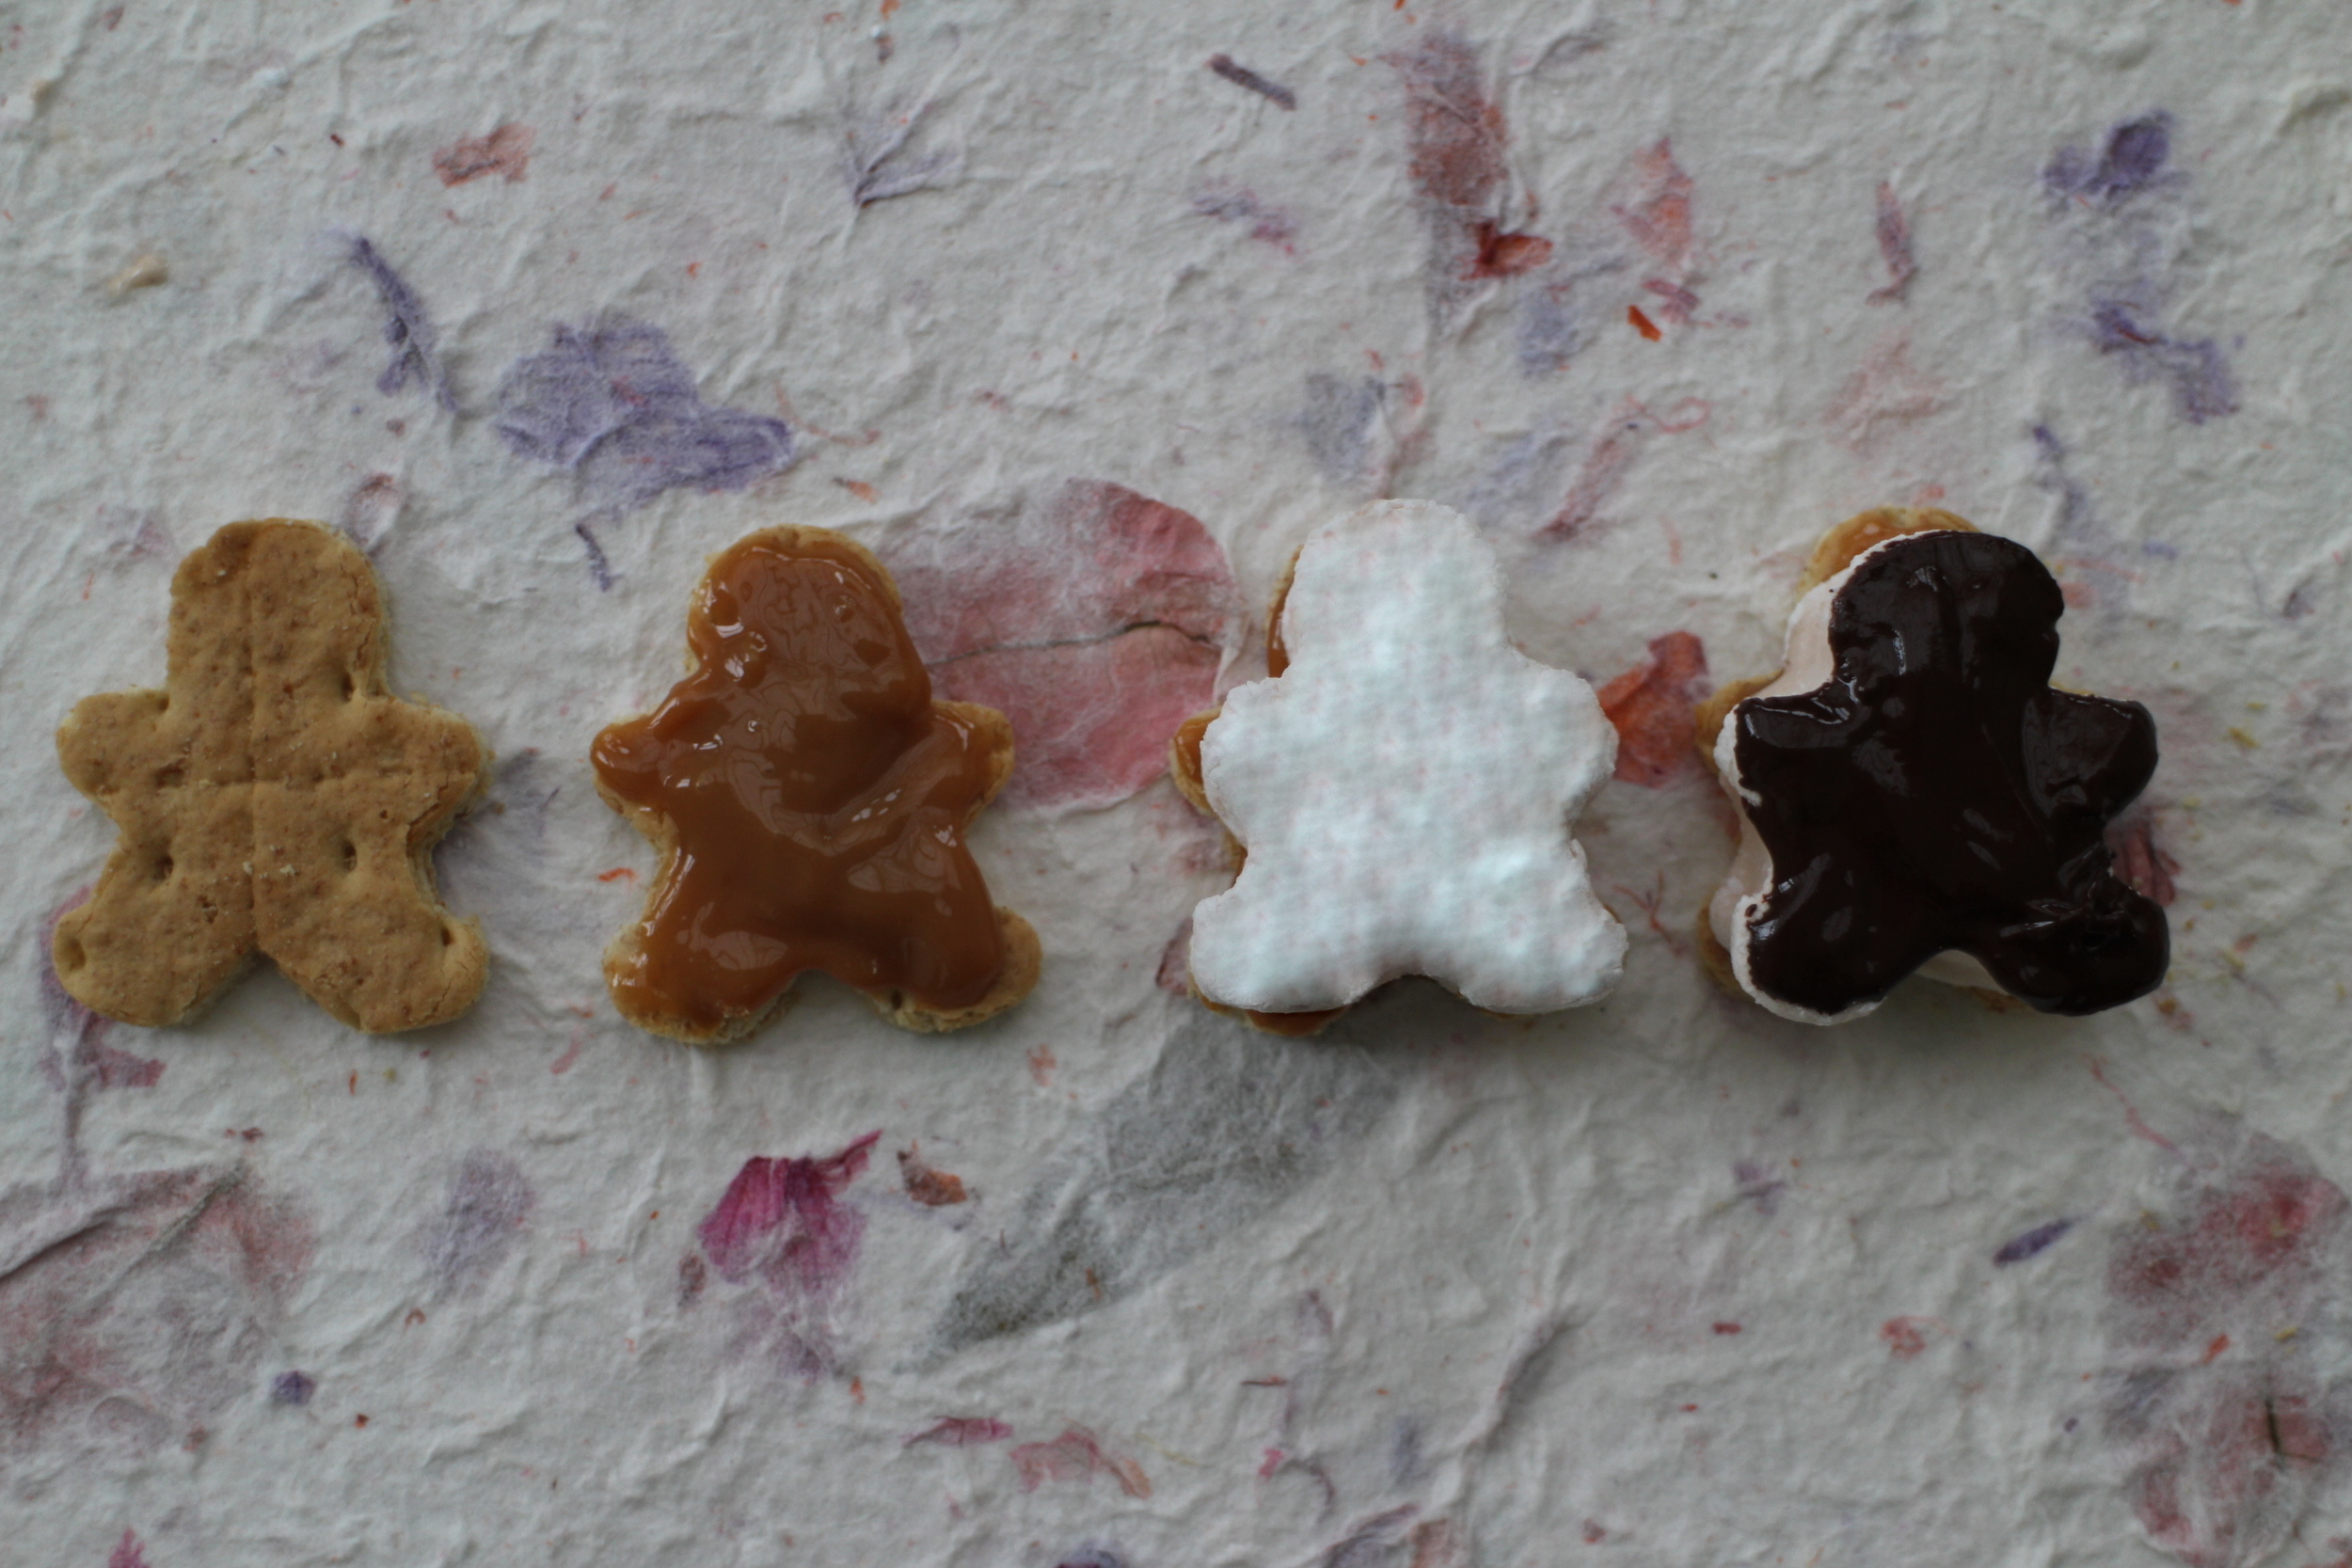
I tried three ways: cut into regular blocks; cut into blocks and then dipped into melted chocolate and crumbled gingerbread biscuits (this was Joy The Baker's way of doing it); and then cut into little men and turned into Gingerbread Men S'mores. For the S'mores, I got a biscuit (I used a Graham's cracker but if you don't have access to these you could use, say, a gingernut biscuit istead) and heated it in the microwave for around 30 seconds - it turns soft and then working fast, you can cut it into your desired shape using a cookie cutter. So I cut my biscuit into a little man, spread him with a little dulce de leche, popped a marshmallow man on top, dipped him in chocolate and then covered him with sprinkles. Such fun! This is really your opportunity to be completely creative and make whatever you fancy.

Gingerbread Men 2.JPG

Marshmallows are fun. Home-made ones are definitely the best. And the beauty is that there are so many different flavours with which you can experiment.

Enjoy discovering your own favourite :)

Gingerbread Marshmallows (from Joy The Baker's Bonkers Awesome Gingerbread Spiced Marshmallows)

Ingredients

  • 1 CUP COLD WATER, SPLIT INTO 2 x 1/2 cups
  • 14G POWDERED GELATIN
  • 415G CASTER SUGAR
  • 270G GLUCOSE
  • 1/4 TSP SALT
  • 2 TSP VANILLA EXTRACT
  • 1/2 TSP GROUND CINNAMON
  • 1/2 TSP GROUND GINGER
  • 1/4 TSP GROUND NUTMEG
  • PINCH OF GROUND CLOVES
  • VEGETABLE OIL TO COAT YOUR TIN
  • ICING SUGAR TO COAT YOUR TIN

Method

  • Prepare your tin by coating it with vegetable oil and then cover that with icing sugar - you're looking for a thick coating so that the icing sugar looks solid white (alternatively you could line your baking tin with some greaseproof paper, lightly oiled on the inside)
  • Pour 1/2 cup of water into your stand mixer and then sprinkle the powdered gelatin over the top
  • Leave to stand for 10 mins
  • In a medium saucepan, heat the sugar, glucose, salt and other 1/2 cup of water and heat over a medium heat until it boils giving it a mix to make sure the ingredients are dissolved
  • Then using a candy thermometer, heat the mixture to 240 degrees without stirring it
  • When the sugar mixture reaches 240 degrees, turn the stand mixer onto a low speed and start to pour it in a slow, steady stream into the gelatin (you're starting on a low speed so the hot mixture doesn't spatter everywhere and burn you)
  • Gradually increase the speed of the mixer as you're pouring in the sugar until you're at high speed and all the sugar has been added
  • Continue beating at this speed for around 10 mins until the mixture has more than doubled in size and looks like fluffy white marshmallows
  • Add the vanilla extract and the spices and mix for a further 3 minutes
  • Gently pour the marshmallow mixture into the prepared tin and smooth the surface if required with a wet spatula
  • Leave to set for at least 3 hours or overnight
  • When you come to cut up the marshmallow, use a hot wet knife or use a hot wet cutter to cut it into shapes
  • Decorate your marshmallows as you like (some ideas are above) or enjoy them naked, just as they are :)
In Celebrations, Chocolates & Sweeties Tags Gingerbread, Ginger, Marshmallows, Grahams Crackers
Comment

S'mores Cupcakes

September 15, 2015 Nicola King

We're back to school! Great to have the boys back with their friends but our house has felt awfully empty these last few days. So plenty of time to reminisce about our wonderful holidays and favourite moments. The boys absolutely loved our time in Canada back in July and if you ask them their favourite part, it would be when daddy insisted we make an impromptu camping expedition into the Algonquin National Park.

Cue an overnight stay in the wild (with bears, loons, chipmunks and rutting moose!) It took us around three hours to paddle to our lake and we pitched our tent on a little deserted island, a little different to camping in the UK where you're in a field surrounded by tons of other people - you definitely feel out in the wilds. We'd been warned that a wild bear had been into one of the camps the previous night and stolen all the food and guess which was the only campsite left on the lake? You guessed right! I spent the whole night listening for the padding of bears' paws outside our tent and hubby and I had a rather comical time balancing me on his shoulders whilst I tried to suspend all of our food and cooking equipment in a giant plastic barrel six feet in between two trees out of the bears' reach. We collected our own firewood, started a fire for warmth and cooked dinner over the open flame. I rustled up a mean chicken and rice stew and then had my first attempt at making S'mores. I don't think I got it quite right, but I swear they were the best dessert - although I think that was a lot to do with being in the wild and cooking them over an open fire! Yum :)

I wanted to recreate a taste of the summer to reward the boys for their return to school. I returned from Canada with Graham's crackers and found some Hershey's chocolate to go with them. When I was looking for a S'mores creation, I found this lovely recipe for S'mores Cupcakes from Pastry Affair. I decided to make just 8 cupcakes rather than the 24 in the original recipe so the quantities below are for just 8 and can be factored up to make as many as you like. What I love about these cupcakes is the Graham's cracker crust at the base of the chocolate cake which added not only a really delicious flavour, but also a little crunch. These are baked for 5 mins in the oven before adding the cupcake batter and they really crisp up in this time. Kristen suggests using whichever chocolate cupcake recipe we like at this point so I used my regular recipe here.

Then she adds a chocolate glaze which is where my Hershey bars came in handy and I like to think added an authentic S'mores touch to the little cupcakes! Finally a topping of marshmallow which is then browned under a blowtorch. The marshmallow didn't whip up quite as much as I'd like so I'd probably play around with the quantities next time but although it might look a little flatter than I'd like, it definitely tasted delicious astride these little cupcakes.

These cupcakes aren't difficult to make, they just have a couple of added stages to regular buttercream cupcakes with the crumb base and chocolate glaze. And they are delicious! The boys both loved them and scoffed them within minutes. The added chocolate glaze and marshmallow topping make a slightly more decadent treat but one well worth indulging :)

The only thing that would have make these better would have been eating them back on our little island. I mean, who could resist a view like this and something so delicious to eat?

S'mores Cupcakes Makes 8 cupcakes (recipe idea from Pastry Affair) 

Graham Cracker Crust Ingredients

  • 3 GRAHAM CRACKER (makes around 1 cup and the crumbs are crushed in a plastic bag with a rolling pin)
  • 2 TBSP CASTER SUGAR
  • 30G BUTTER, MELTED

Chocolate Cupcakes Ingredients

  • 75G DARK CHOCOLATE - MIN 70% COCOA SOLIDS (broken down into pieces) 
  • 45G BUTTER, SOFTENED
  • 90G SOFT BROWN SUGAR
  • 1 LARGE EGG, SEPARATED
  • 95G SIFTED PLAIN FLOUR
  • 1/3 TSP BAKING POWDER
  • 1/3 TSP BICARBONATE OF SODA
  • PINCH OF SALT
  • 125ML SEMI-SKIMMED MILK AT ROOM TEMP
  • 1/2 TSP VANILLA EXTRACT

Chocolate Glaze Ingredients

  • 55G DARK CHOCOLATE (I used Hershey's here for an authentic S'mores taste!)
  • 30G BUTTER
  • 1/2 TSP GLUCOSE

Marshmallow Topping

  • 80G LIQUID EGG WHITES
  • 115G CASTER SUGAR

Method

  1. Preheat the oven to 180 degrees (fan) and line a cupcake tin with 8 cupcake cases
  2. Mix together the Graham Cracker Crust ingredients and then put a tablespoon into the bottom of each cupcake case
  3. Using a glass, squash the crumbs gently until they form a solid base
  4. Bake for 5 mins
  5. Allow to cool for 10 mins before adding the cupcake batter
  6. Turn down the oven to 170 degrees (fan)
  7. To make the Chocolate Cupcake batter, firstly melt the chocolate in the microwave taking care not to burn your chocolate - I remove mine from the microwave when there are still a few smaller lumps and then stir it until it's all fully melted
  8. Put the chocolate to one side to cool a little
  9. Cream together the butter and sugar for around 5 minutes until light and smooth
  10. Beat the egg yolks in a separate bowl and then add them slowly to the butter mixture with the mixer on a medium speed
  11. Scrape down the sides of the bowl and ensure the mixture is fully mixed
  12. Add the melted chocolate and ensure this is fully mixed in, scraping down the sides and bottom of the bowl
  13. Combine the flour, salt, bicarbonate of soda and baking powder in a separate bowl
  14. Add the milk to a jug (must be at room temperature else if it's really cold, when it's added to the melted chocolate it tends to solidify some of the chocolate) and mix in the vanilla extract
  15. Add 1/3 of the flour mixture to the mixer and ensure it's fully incorporated and then add 1/3 milk mixture and ensure that is fully incorporated
  16. Do this twice more until all the flour and milk are mixed in
  17. Again, scrape down the sides to ensure that the mixture is all fully incorporated
  18. Whisk the egg whites in a separate bowl until they're whipped to soft peak
  19. Fold in the egg whites to the cake batter with a metal spoon ensuring that you don't knock the air out of the mixture
  20. Spoon the batter into the cupcakes cases until they're 2/3 full
  21. Bake for around 20 mins and ensure that a skewer inserted in the middle comes out clean
  22. Leave the cupcakes in the tin for 10 mins before removing them and cooling them on a rack
  23. To make the Chocolate Glaze, mix all the ingredients for this in a saucepan over a medium heat until they're combined
  24. Leave to stand at room temperature for 30 minutes stirring from time to time
  25. When this is a spreadable consistency, coat the top of each cupcake with the glaze
  26. To make the Marshmallow Topping, mix the egg whites and sugar and warm in the microwave until they're at body temperature (around 37 degrees celcius)
  27. Transfer to a mixer and mix for around 5 to 10 minutes until they're glossy and whisked to stiff peaks
  28. Using a piping bag, add a swirl of meringue topping to each cupcake
  29. Using a kitchen torch, lightly brown the marshmallow topping (or you can put this under the grill - in either case, watch them very carefully as they brown VERY quickly!)
  30. Enjoy :)
In Cupcakes Tags Marshmallows, Chocolate, Grahams Crackers, S'mores
Comment

To subscribe, please enter your email address:

Delivered by FeedBurner

Yay for the weekend!! If you saw how I made pineapple flowers earlier this week, here they are adorning my very first Hummingbird cake. I am totally in love with them! I also added a few @edible_flowers to complement them and this makes the perfect w
I was so grateful to be #gifted some beautiful @cotswoldflour flour recently with a challenge to make something from my #bakingbucketlist and so I set about making a Nutella babka and scrolls with them. I’ve had a mixed love affair with bread m
I found the cutest miniature pineapple in the local petrol station co-op so decided to make these roasted pineapple flowers. I think they’re so pretty and remind me of lovely sunflowers. I thought they’d go well with a Hummingbird cake so
We had great fun baking this Malteser Millionaire’s Shortbread which is absolutely delicious! This was something the boys wanted to bake - who can resist a delicious shortbread base, topped with gooey caramel and then a final layer of swirled m
As the rain and clouds returned to our skies this weekend, we’ve been looking for comforting lockdown treats. These Blackberry & Star Anise Friands, dripping with sticky blackberry juice icing are the perfect choice 💗 The recipe is from Sw
You might have seen from my Stories this weekend that I made cinnamon buns. I don’t have the best track record with bread but I’m overcoming my inner fear! These buns were so delicious. It was an amalgamation of a few recipes but the base
  • Serendipity Bakes
    Coconut & Raspberry Friand Muffins
    May 29, 2019, 9:38 PM
  • Serendipity Bakes
    Thank you for sharing my photo of your delicious recipe 😋 @rkhooks Happy Sunday! https://t.co/niKamgfjvt
    Mar 3, 2019, 2:38 PM
  • Serendipity Bakes
    RT @BiscuiteersLtd: Our friends at @thewhitecompany asked us to design something special to celebrate their New York stores first birth… https://t.co/kTsMH57wRv
    Jun 28, 2018, 11:09 AM

Enter your email address:

Delivered by FeedBurner

Powered by Squarespace

Nicola King at Serendipity Bakes Follow my blog with Bloglovin Follow